Best Beginner Camp Stoves: Easy to Learn
By Amina Al-Khalil • 27th Mar
Choosing your first camp stove feels like a high-stakes decision. Overwhelmed by choice, burdened by marketing claims, and unsure whether a stove will perform when the weather turns, many beginners either over-buy complexity they don't need or settle for a good camp stove that leaves them frustrated when wind picks up or the flame won't light in the cold. The truth is simpler: pick a design you can understand, learn to operate with confidence, and service yourself when something goes sideways. A stove you can fix beats a lighter one you can't.
Beginners thrive on clarity. That means starting with simple stove operation, straightforward fuel logic, and enough inherent stability that you're cooking dinner, not troubleshooting gear. This guide cuts through the noise and arms you with the data, comparisons, and checklists to land on a stove that will teach you the fundamentals without surprises.
Why Beginners Need Reliable, Learnable Stoves
The stakes aren't dramatic, but they're real. Underperformance in the field erodes confidence. A canister stove that sputters in a 20-knot wind, a piezo igniter that won't spark with cold-stiffened fingers, or a narrow pot support that sends your dinner sliding sideways (these aren't gear quirks; they're teaching failures). They consume mental energy that should go toward learning cooking technique, fuel math, and weather sense.
Reliability builds rapidly once you remove the friction. When you light your stove and it just works, meal prep becomes routine. You learn where the burner sits happiest, how long a cup of water takes to boil, and what "medium simmer" actually feels like. That foundation matters far more than whether your stove is ultralight or integrated with a pot.
Second, beginners benefit from modular thinking. A stove that bolts to a canister, a separate windscreen, and a standalone pot teach you how the whole system interconnects. You'll understand why wind matters, how canister pressure changes with temperature, and what spare parts fit in your repair kit. Integrated systems hide those lessons. Later, on routes where you need to adapt (swap fuel types, scale to cook for six, or use what the local outfitter stocks), modular knowledge pays dividends.
Third, easy learning curve directly correlates with consistency. Beginners don't yet have the reflexive safety habits of experienced outdoorspeople. A stove with fail-safes (a large, stable base; controls that are hard to accidentally bump; clear on/off positions) reduces the incidents that breed caution and second-guessing. You're learning to cook over flame again, essentially from scratch. Make that learning smooth, and you'll return to camp cooking trip after trip.
The Best Beginner Camp Stoves: Comparison & Real-World Context
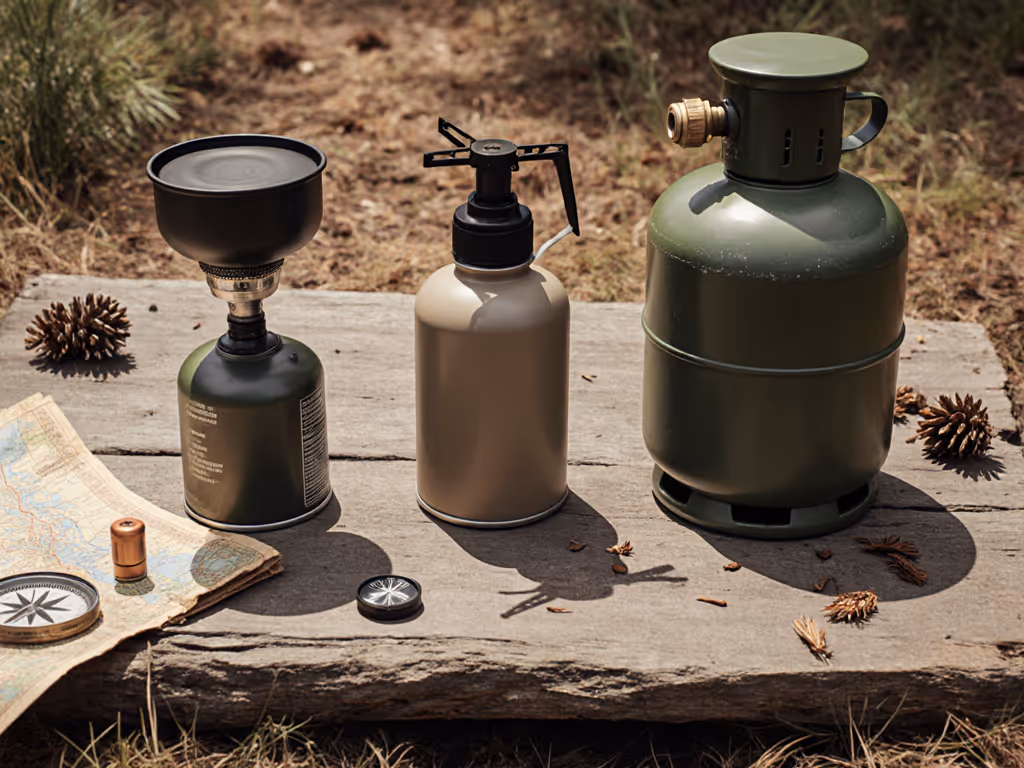
Three stove families dominate beginner choices: canister stoves (compact, lightweight, one-piece), remote canister stoves (larger but very stable, fuel separate from burner), and car-camp propane stoves (high output, easy refueling, robust). If you want a quick primer on when each shines, start with our stove types overview. Each has earned its reputation through real-world performance. The data from 2026 field tests confirms that beginners succeed fastest with straightforward designs in the canister and propane camps.
Canister Stoves: The Fast Learning Path
Jetboil Flash 1.0L Fast Boil System and MSR Pocket Rocket 2 dominate beginner recommendations because they strip away decisions. Both thread onto any standard fuel canister, sit stable on most pots, and ignite reliably. The Jetboil pairs a burner, pot, and nesting cup into a sealed system, which means less to learn about pot compatibility but also less flexibility later. The MSR is looser (a minimal burner head that works with your own cookware), which makes it slightly slower to master but teaches modularity from day one.
For beginners, canister stoves solve a critical problem: fuel availability. Isobutane-propane mix canisters are sold at every outdoor retailer in North America, Western Europe, and Australia/NZ. You don't need to research exotic white-gas dealers or cross-border hazmat rules. Buy, screw on, light. That simplicity accelerates the learning curve.
The tradeoff is cold performance. Below freezing, canister pressure drops noticeably. For field-proven tips to keep canister stoves running in the cold, see canister stove cold-weather strategies. Beginners camping in winter or at altitude often don't predict this and run short on fuel or face weak flame. The solution (inverted-canister stoves that draw liquid fuel) introduces complexity many beginners aren't ready for. Save that lesson for trip two or three.
What to learn first:
- Canister stoves have simple stove operation: screw on, adjust valve (or use piezo for no-thought lighting), set pot down, cook.
- They're modular; spare O-rings weigh almost nothing and prevent fuel leaks if you strip a threaded connection.
- Stable design means most won't tip if you bump the pot or operate on slightly unlevel ground.
Remote Canister Stoves: Stepping Up Without Overcomplicating
Soto WindMaster and MSR WindBurner represent the next rung. The burner connects to the fuel canister via a hose, placing the canister to the side or below. This setup is inherently more stable than a top-mounted canister because weight is lower and distributed. It also lets you use taller pots or heat a larger cooking vessel, which matters when you advance to stir-frying or simmering chili for four.
Soto WindMaster has earned reputation as the highest-performing canister stove in wind due to its flame design and burner geometry. For beginners willing to spend an extra $20 and take five minutes to read the manual, it's the step-up that rarely disappoints. MSR WindBurner is fully integrated (burner, pot, windscreen), which removes fuel-mismatch problems but again reduces modular learning.
Learning leap here:
- Hose-fed burners introduce fuel lines, connection points, and one more step to setup. But they're still one-button (or one spark) to ignition.
- Windscreens are built-in, teaching the relationship between wind and flame efficiency without requiring you to field-rig a solution.
- Slightly higher cost is offset by fewer failures if you bump the base.
Propane Camp Stoves: Simplicity at Scale
Camp Chef Everest 2X stands out in data-driven reviews as the standard-bearer for car-camp stoves. Two burners, stable frame, adjustable feet, easy refueling with standard 1 lb propane cylinders. The ignition is a simple spark knob; the controls are unmissable. For families or groups staying in basecamp, it's a kitchen table that happens to be portable.
Jetboil Genesis Basecamp represents the premium alternative (more compact, still two burners, with integrated ignition and controls). Both teach the same lesson: camper propane stove solutions are about confidence and capacity, not weight optimization.
Why propane for beginners in car-camping? First, refueling is genuinely simple. You unscrew an empty cylinder, screw on a full one from the gas station, and cook. Second, the stove itself is nearly bulletproof. No fuel-line leaks, no canister pressure drop, no piezo reliability gambles. Third, two burners mean you can simmer beans while boiling pasta, a real cooking freedom beginners haven't experienced in the backcountry.
The downside is waste. Propane cylinders are single-use disposables in most regions (though some specialists now offer exchange programs). If leaving minimal trash matters to you (and it does for anyone with a Leave No Trace ethic), save this option for established, developed campgrounds or plan to haul cylinders home for recycling.
Beginner advantage:
- Propane stoves are bulk-and-stable, not ultralight. You're not optimizing ounces at the base camp.
- Fuel is reliable and abundant in developed countries.
- Maintenance is minimal; spare parts are standardized and cheap.
Simple Operation Checklist: From Unboxing to Dinner
Every beginner benefits from a repeatable pre-trip and in-field checklist. This removes decision-making under stress and catches failures in camp prep, not at 7 p.m. with hungry people.
Pre-Trip Setup (Home)
- Inspect your fuel canister or cylinder for dents or punctures.
- Connect burner to fuel source (or assemble your stove if multi-piece) and thread/screw with hand pressure until snug. Do not overtighten; one-quarter turn past snug is enough. Excessive torque strips threads and creates leaks.
- Test ignition indoors (over a sink; safe but loud) to confirm the spark works or the fuel flows.
- Check all O-rings for cracks, hardening, or missing sections. Spare O-rings weigh almost nothing and are $2 insurance.
- Pack a backup lighter and one spare fuel canister if you're longer than three days or in cold conditions.
- Review your cookware: Does your largest pot sit flat on the pot support? Is it stable, or does it rock?
In-Field Setup (Camp)
- Choose a level, wind-sheltered spot (rock outcrop, tree wind-block, cook near your tent's lee side if safe).
- Assemble your stove on a stable, non-flammable surface (rock, metal tray, bare ground, not leaves or cloth).
- Load your pot with water and set it on the burner to confirm it sits true without rocking.
- Light and let flame stabilize for 10 seconds before adjusting to desired heat.
- Keep your backup lighter and any second fuel sources within arm's reach.
Post-Meal Shutdown
- Turn off burner and wait two minutes for it to cool.
- If using a canister stove, unscrew the burner and store the now-exposed fuel canister away from your tent and food cache.
- Wipe down any spilled fuel or pot residue; insects and grit attract bears and create mess the next morning.
Fuel Planning: The Data-Driven Way
Beginners almost always over-pack fuel or run short. Both mistakes are expensive (weight or anxiety). Here's how to dial it in.
A canister stove with a typical aluminum pot boils one liter of room-temperature water in roughly 4-5 minutes and uses about 5-8 grams of fuel (depending on altitude, wind, and canister pressure). Simmering a pot of chili for 20 minutes uses roughly 15-25 grams. A three-day trip with breakfast (instant oatmeal, one boil), lunch (cold or no-cook), and dinner (one boil for pasta, 20 minutes simmering) burns roughly 150-200 grams of fuel. Add a buffer for wind, cold, failed ignitions, and altitude: pack 250 grams (roughly 8-9 oz) per person for three days. Two people carry two canisters (total ~500g); one standard canister is 220g net fuel, so bring two with a partial third at home as backup.
For propane car-camp stoves, the math is similar but the cylinder is larger. A standard 1 lb (454g) propane cylinder feeds two burners for roughly a week of heavy use. For a weekend, one cylinder is more than enough; haul it home and return it for exchange (or recycle if no exchange program exists near you).
Waste-reduction insight: Liquid-fuel options (white gas, kerosene, alcohol) require priming and careful handling but generate zero canisters. They suit ambitious beginners and multi-week trips. Most beginners, though, should master canister operation before embracing the complexity.
Field Maintenance & Self-Sufficiency
The heart of beginner confidence is knowing what to do when something fails. Most failures are simple. Use our camp stove repair guide to diagnose and fix common issues fast.
Weak flame or slow boil: Clogged jet. Your burner's fuel opening is a tiny port; dust, lint from your pack, or detritus from the canister blocks it. Fix: Unscrew the burner (hand-tight is fine), soak it for 10 minutes in hot water, then use a thin wire or safety pin to gently clear the jet opening. Dry it and reinstall.
Fuel leaking from connection point: Stripped O-ring or loose threads. Turn the burner off, unscrew it from the canister, inspect the O-ring for tears, and replace it if needed (a $2 spare in your kit). If the O-ring is fine, simply re-thread carefully, one-quarter turn past snug. Overtightening is the silent killer of rookie stove trips.
Won't ignite (piezo stove): Damp spark gap or weak contact. Unscrew the burner and inspect the spark electrode for debris. A dry cloth wipes it clean. If it still won't spark, you have a lighter backup, right? Yes, that's why you packed one.
Canister pressure too low (especially in cold): This isn't a failure; it's physics. A canister at 20°F produces far less pressure than one at 60°F. In cold, shelter the canister or switch to an inverted-canister stove (next-trip learning). In the short term, add a mug of warm (not boiling) water around the canister to briefly boost pressure.
What to pack: one backup lighter, one spare O-ring for your burner, a small brass wire brush (to gently clean jets), and a tiny bottle of food-grade mineral oil (to lubricate O-rings on liquid-fuel stoves). Total weight: under 100 grams. Fix it, fuel it smart, pack out less, every trip.
Low-Waste Cooking Practices
Beginners often assume disposable canisters are the norm. They're not the only path. Refillable 1 lb propane cylinders are legal, common, and generate zero single-use waste. Many outdoor retailers and all propane suppliers now exchange them. If you have a car-camp setup, choose a stove designed for refillables from the start (Camp Chef, Jetboil Genesis, Coleman classics).
For backpacking, canister stoves are the practical norm, but take responsibility: Pinch the valve until no hiss escapes, crush the empty can slightly (to prevent accidental ignition), and pack it out to a store that recycles aluminum (most recycling centers do). Some gear companies (isobutane cartridges sold by MSR, Soto, and others) now use aluminum designed for clean recycling.
Waste reduction at the stove: Use a windscreen (nearly doubles efficiency), pot lid (cuts boil time by 30%), and insulated pot cozy or sitting it on a foam pad to retain heat. These changes drop fuel consumption by a quarter and make every degree of warmth work harder.
Ready to Choose?
Here's the actionable path forward:
If you're car camping or basecamp cooking: Start with a Camp Chef Everest 2X or Jetboil Genesis Basecamp (canister or refillable propane, depending on your waste priorities). Two burners, rock-solid stability, near-zero learning curve, and you'll master stove cooking fundamentals fast.
If you're backpacking or trail cooking for 3-5 days: Buy an MSR Pocket Rocket 2 (you learn modularity and fuel management) or step up immediately to a Soto WindMaster if you anticipate wind and want the most forgiving design. Both are beginner-proof once you've read the manual and done one test run at home.
If you're in cold (below freezing) or high altitude: Commit to learning an inverted-canister stove next (MSR WindBurner, Soto Amicus) after your first trip. Your next purchase, not your first.
Before you buy, test it. Visit a specialty retailer, hold it, screw on a dummy canister (or ask to light it outdoors), and confirm the controls feel intuitive to you. Trust your hands, not the five-star review from someone with different preferences.
Then pack a checklist, spare O-rings, a backup lighter, and go cook dinner in the dirt. Confidence compounds fast once the basics are truly simple. You'll be teaching the next beginner within a season.
Related Articles