Best Glacier-Ready Stoves for Extreme Cold
By Ingrid Sørensen • 7th Mar
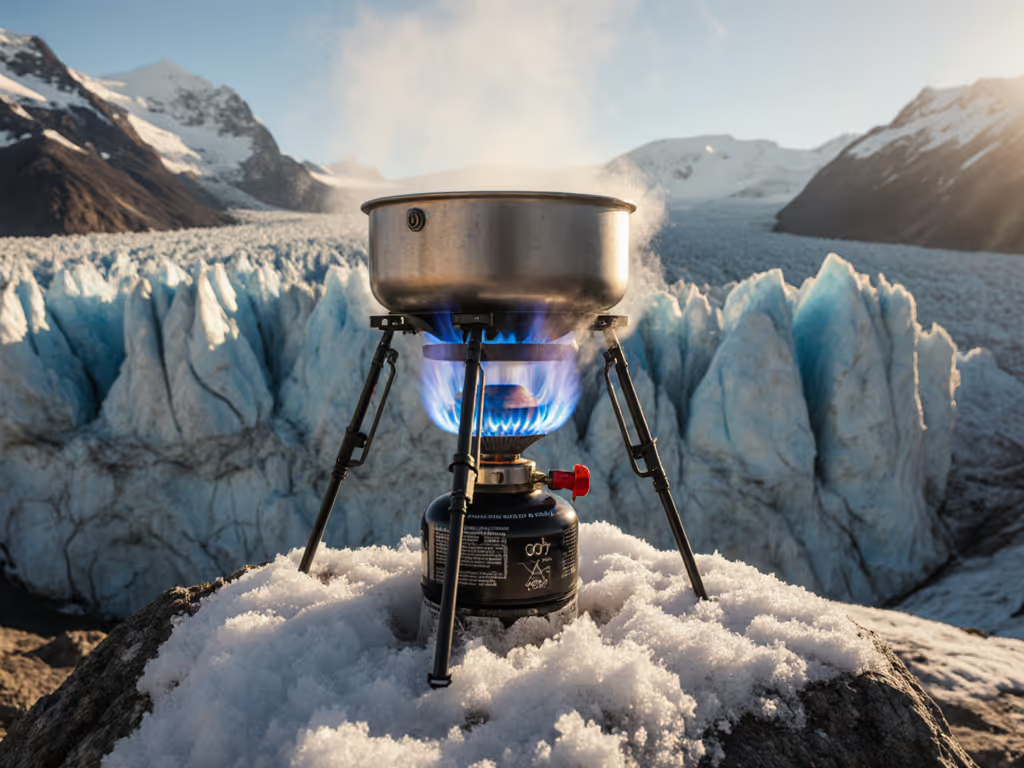
When you're climbing toward the summit of a glacier or setting up camp at 20,000 feet, a glacier-ready stove and an extreme cold weather stove aren't luxuries (they're safety gear). The difference between a stove that lights reliably below freezing and one that sputters out can mean the difference between a warm meal and a dangerous night. I've spent years matching stoves to real conditions, and I've learned that stability is kindness: a stove that performs predictably in wind, altitude, and ice-level temperatures keeps your team fed, warm, and together. For high-elevation specifics, see our high-altitude stove performance comparison.
This guide cuts through marketing claims and presents field-tested glacier-ready and cryogenic temperature performance stoves that have been proven in hostile alpine environments. You'll find a mix of integrated systems, remote canister models, and multi-fuel options, each with honest performance data, trade-offs, and a clear sense of when to choose each one.
What Makes a Stove Glacier-Ready?
Before diving into the lineup, let's define what separates a true glacier-ready stove from a standard canister model. A genuine extreme cold performer must:
- Maintain fuel pressure in subzero temperatures via a regulator (inverted canister designs help too)
- Heat efficiently with minimal exposed metal that conducts heat away from the pot
- Ignite reliably in thin air, wind gusts, and with thick gloves
- Melt snow and boil water quickly, because time in a whiteout is danger
- Stabilize securely on uneven, icy terrain
- Perform predictably when tested in actual alpine weather, not just sales promises
Many backpacking stoves hit a few of these marks. True glacier stoves hit all of them.
1. MSR Reactor 1.7L Stove System: The Gold Standard for Alpine Melting
If you're planning trips to Denali, Rainier, the Himalayas, or arctic environments, the MSR Reactor 1.7L is the stove that expedition teams and guide services trust. This is the stove you reach for when melting snow is non-negotiable and every degree of efficiency matters.
The numbers tell the story. The Reactor's 9,000-BTU radiant burner and integrated heat exchanger have been field-tested to boil water and melt snow in sub-zero temperatures at elevations above 20,000 feet, conditions where many stoves simply won't light. One tester described the ignition experience as "igniting a plane engine," which captures both the power and the intensity.
Why it dominates in extreme conditions:
- Powerful burner output (9,000 BTU) melts snow faster, cutting fuel consumption and saving precious time
- Integrated 1L pot with hard-anodized aluminum reduces handling demands and heat loss
- Protective housing shields the flame and burner from wind, critical for high-altitude cook zones
- The integrated lid design prevents loss in whiteout conditions and secures the pot reliably
- Pressure regulator maintains consistent flame even as canister pressure drops in the cold
Trade-offs and honest caveats:
At 1 lb. 1 oz., this stove is heavy by backpacking standards, and at $290, it's expensive. It does not simmer well (this is a boil-and-melt machine, not a sauce reducer). The integrated pot and protective housing mean you're locked into one cooking vessel, and the metal gets very hot: you'll burn yourself without gloves or an oven mitt nearby. If your trip involves delicate sauce work or sautéing, this stove will frustrate you.
But if your goal is rapid snow melting at altitude, reliable ignition in extreme cold, and a margin of safety in the most hostile environments, the Reactor is the choice. As one expedition leader noted, "I wouldn't want any other stove in frigid temperatures if I needed to melt snow for drinking water or to boil water for a meal."
Best suited for: High-altitude mountaineering, polar expeditions, winter alpine climbing, and any trip where the stove's weight and cost are justified by the hostility of the environment.
2. Jetboil MiniMo: The Lightweight All-Around Cold Performer
For climbers who want extreme cold capability without the Reactor's heft and expense, the Jetboil MiniMo bridges the gap. In field testing, this stove boiled water quickly in cold, windy conditions, outperformed in its category, and matched some of the speed of more expensive competitors.
The MiniMo is a fully integrated system: the 800 mL heat-exchanger pot is locked to the burner assembly. This design minimizes heat loss and wind exposure. The simmer control is notably better than standard canister stoves, a trait that sets Jetboil apart when you want to warm beverages, melt chocolate, or reheat premade meals without scorching.
Key attributes:
- Lighter and more compact than the Reactor, making it practical for longer backcountry days
- Heat-exchanger pot reduces boil times compared to open systems
- Integrated design means fewer connections to fail and no pot-to-burner mismatch
- Simmer capability allows gentle warming and basic cooking, not just boiling
- Piezo igniter (though always have a backup lighter in the field)
Limitations:
The MiniMo is not rated for the absolute lowest temperatures where the Reactor excels. It's an excellent cold-weather performer, but in the deep polar or extreme high-altitude regime, the MSR Reactor's pressure regulator and heavier construction have an edge. At around $130-$150, the MiniMo is mid-range priced, and the integrated pot limits flexibility if you need to switch to a larger pan or griddle.
Best suited for: Winter mountaineering, alpine climbing in moderate-to-extreme conditions, ski touring with group meals, and trips where simmer control and reasonable weight matter as much as absolute cold-weather supremacy.
3. MSR WhisperLite Universal: The Multi-Fuel Workhorse
When you're planning an international expedition or traveling to high altitude where canister fuel may be unavailable or banned, the MSR WhisperLite Universal offers what no canister stove can: the ability to run on white gas, kerosene, diesel, or isobutane. This flexibility is a lifesaver on remote routes and in developing countries.
White gas and liquid fuels perform reliably in deep cold and at extreme elevations where isobutane canisters lose pressure. The WhisperLite has been used on Himalayan expeditions, high-altitude research camps, and polar travel for decades because it works when other systems falter.
Why it's valuable in extreme conditions:
- Liquid fuel maintains usable pressure far below the temperature limits of canisters
- Can be refueled from jerry cans and local sources; not dependent on disposable canisters
- Proven track record on major expeditions; spare parts and expertise are widely available
- Field-repairable with basic tools; the burner, pump, and O-rings are user-serviceable
- No risk of canister freeze-off in extreme cold
The downside:
Liquid fuel stoves demand more user skill. Priming the burner (heating the fuel line until liquid fuel vaporizes) involves open flame and can cause flare-ups if you're not practiced. The stove produces soot and requires more cleanup than canister models. Pumping the fuel bottle to pressurize it is an extra step. The learning curve is real, and a mistake in the field can ruin a meal or, worse, cause burns.
Weight is also a factor: the stove, fuel bottle, and maintenance kit add up. For a three-day trip, the MSR Reactor is lighter. For a month-long expedition where you'll refuel multiple times, the WhisperLite's flexibility and reliability justify the extra skill and weight.
Best suited for: International expeditions, remote high-altitude routes, extended polar travel, research camps, and trips where fuel availability or extreme cold performance overrides the desire for convenience.
4. Soto WindMaster: The Budget-Friendly Cold Contender
At $70, the Soto WindMaster has earned its place as a top all-around backpacking stove, and it deserves consideration for cold weather trips, especially when paired with a windscreen and careful fuel planning.
The WindMaster features a wide burner with good wind resistance built in, and the flame adjustability is smooth and intuitive, a trait that matters when you're trying to simmer soup at 12,000 feet. The burner surface spreads heat evenly over a wider pot base compared to pin-style competitors, reducing the risk of hot spots and improving stability.
Why it's a solid cold-weather choice:
- Affordable entry point for intermediate climbers building a cold-weather kit
- Wide, stable burner base fits many popular backpacking pots
- Good simmer control for cooking, not just boiling
- Compact and lightweight, making it ideal for ski tours and alpine approaches
- Reliable ignition with a straightforward, glove-friendly design
Where it falls short in extreme cold:
The WindMaster lacks a pressure regulator, which means fuel pressure and burner output drop as the canister cools and empties. In deep subzero conditions (below -15°C), this pressure drop becomes noticeable. The stove is not integrated, so you're managing a separate pot-to-burner connection, adding minimal complexity but also a point of failure. At the Reactor's altitudes and temperatures, the WindMaster will struggle.
Best suited for: Winter backpacking, ice climbing in moderate cold (-10°C to -20°C), ski touring, and high-altitude trips in the 12,000-18,000 ft range where extreme cold is a factor but not the defining challenge. Excellent for budget-conscious teams building redundant stove systems.
5. Primus PrimeTech Stove System 1.3L: The Remote-Canister Cold Specialist
The Primus PrimeTech ($200) uses a remote canister design, allowing you to invert the fuel bottle and tuck it inside your jacket to keep it warm, a technique that dramatically extends performance in extreme cold.
Remote canister systems let you separate the burner (which sits on or near your cookpot) from the fuel reservoir (which you can warm and stabilize). This design unlocks better simmer control, safer handling, and crucially, improved fuel pressure in the cold.
Key advantages:
- Inverted canister design can be warmed inside a sleeping bag or jacket to prevent pressure drop
- Integrated regulator helps maintain consistent flame as temperature falls
- Separate pot allows flexible cookware choices; the system doesn't lock you into one size
- Good boil times: the Primus achieved the second-fastest half-liter boil in field testing at 1:50, just 15 seconds behind the Jetboil MilliJoule
- 1.3L stainless steel pot is reasonably sized for group cooking or quick meals
Trade-offs:
Remote systems add a hose connection between burner and canister, another component to manage and maintain. The hose can stiffen in extreme cold, though this is more a nuisance than a failure. At $200, the PrimeTech is higher-priced than the WindMaster and lower than the Reactor, positioning it in the sweet spot for many alpine teams. The learning curve is steeper than a simple canister stove, but less demanding than liquid fuel.
Best suited for: Alpine ski touring, winter mountaineering in the -15°C to -25°C range, high-altitude trips (15,000-22,000 ft), and expeditions where you're comfortable managing a hose and canister warmth strategy.
6. Snow Peak LiteMax: For Ultralight Alpinists
At under 2 oz., the Snow Peak LiteMax is one of the lightest canister stoves on the market, engineered for climbers who weigh every gram and still demand reliable cold-weather performance.
Made from a titanium and aluminum mix, the LiteMax trades some bulk and heat capacity for weight savings. It's a screw-on design (meaning it attaches directly to a compatible canister), offers good flame adjustability through wide support arms, and burns hot, an important trait when you need speed in thin air.
Why ultralight alpinists choose it:
- Minimal weight penalty for reliable ignition and decent cold performance
- Wide support arms offer a broader, more stable base than many micro stoves
- Titanium doesn't accumulate soot or rust, reducing cleaning and maintenance
- Fast boils for its size, critical when time and temperature are both working against you
When it's not the answer:
The LiteMax sacrifices heat exchanger design and regulator technology. In the deepest cold (below -25°C) or at extreme altitudes (above 22,000 ft), it won't match the power or reliability of the Reactor or PrimeTech. It's built for speed and ultralight expeditions, not endurance in the harshest conditions. There's also a learning curve to pairing it with the right canister model and ensuring a solid connection.
Best suited for: Ultralight alpine climbing, fast and light ski mountaineering, single-climber expeditions on well-researched routes, and any mission where shaving 1–2 lbs. from the overall pack weight is the overriding priority.
7. GSI Glacier Stove: The Versatile, Durable Budget Option
The GSI Glacier has earned widespread respect for offering good simmer control, a large and powerful burner, and genuine durability, all at an affordable price. At 5.8 oz. with a canister, it's lightweight enough for backpacking and versatile enough for car-camping setup.
Boil time on the Glacier sits around 5 minutes 30 seconds for 1 liter, respectable but not fastest-in-class. What sets it apart is the simmer: you can actually cook with this stove, not just boil water. The wide burner spreads heat more evenly than pin-style competitors, and the design is simple enough that there's little to break.
When the Glacier makes sense:
- Budget-conscious expeditions where you're buying stoves for a large team
- Trips where cooking (not just boiling) is part of the plan
- Setup where a stable, low-maintenance burner is more valuable than maximum speed
- Intermediate climbers who want a reliable workhorse without a steep learning curve
- Car-camping basecamp stove that can also work for alpine days
Limitations in extreme cold:
Like the WindMaster, the Glacier lacks a regulator, so performance drops in deep cold and as the canister empties. It's not a poor-cold performer, but it's not a glacier specialist either. Above 18,000 ft or in sustained temperatures below -20°C, you'll notice the pressure drop. For extreme-cold mountaineering, better choices exist. For winter basecamp cooking or moderate alpine climbs, the Glacier is solid.
Best suited for: Ski touring camps, moderate winter climbs (-15°C), group expeditions where multiple stoves are cheaper than one expensive system, and trips emphasizing real cooking alongside speed and simplicity.
Fuel, Wind, and Timeline: Planning for Glacier Cooking
Choosing a stove is half the battle. Cooking reliably at altitude and extreme cold demands attention to three more factors: fuel strategy, wind management, and prep timeline.
Fuel planning: Above 15,000 ft, your body burns calories faster, and dehydration accelerates in thin, dry air. Plan for warm meals and calorie-dense food. A liter of boiling water for oatmeal, soup, or tea is non-negotiable. Cold-weather expeditions consume more fuel than summer trips because you're heating food, warming water, and sometimes melting snow. Bring a 10-20% buffer beyond your calculated amount. See our cold-weather fuel performance comparison to plan the right mix and quantities.
Wind management: A windscreen that works with your stove is essential. For canister stoves, use a fabric or aluminum windscreen designed for the model, never fully enclose a canister, as pressure buildup and heat damage are serious risks. Liquid-fuel and remote-canister stoves are more forgiving of full enclosures, but always check your manual. Position your cook site in a natural windbreak (behind a rock, in a ravine, or upwind-sheltered). Even a modest reduction in wind can cut fuel consumption and improve consistency. For gear specifics, check our windscreen guide for safe, efficient setups in gusts.
Timelines and inclusive menus: I once promised pancakes and a mild curry to two hungry kids and a lactose-free friend during a blustery coastal weekend. A wide, stable burner with a real windscreen kept the griddle even and the pot gentle. Breakfast flipped golden, dinner didn't scorch, and everyone felt looked after and warm. The same principle holds at altitude: a stove that simmers evenly and tolerates wind removes stress from mealtimes, which matters more when your body is exhausted and morale is fragile. Family-proof kitchens: stable simmer, quick boils, zero drama. Build your menu around what the stove can actually deliver.
Plan meals in a simple timeline:
- Morning (30 min): Oatmeal, powdered eggs, instant coffee or tea
- Mid-day (15 min): Energy bar or jerky; no stove needed
- Evening (45 min to 1 hr): Soup, instant noodles with added protein, or a lightweight curry paste with rice
This structure accounts for altitude fatigue and shorter daylight, and it keeps the stove duty manageable and safe.
Summary and Final Verdict
Choosing a glacier-ready stove depends on your altitude ceiling, temperature floor, fuel access, and cooking ambitions:
-
For extreme altitude (20,000+ ft) and polar cold: MSR Reactor 1.7L is the standard. Its 9,000-BTU power and integrated design deliver reliability where other systems falter. Accept the weight and expense as insurance.
-
For high-altitude mountaineering (15,000–20,000 ft) and winter alpine climbing: Jetboil MiniMo or Primus PrimeTech offer better balance. You get regulated fuel pressure, simmer capability, and a lighter pack than the Reactor.
-
For international expeditions or routes above 22,000 ft: MSR WhisperLite Universal or a white-gas system is essential if canister fuel is unavailable or unreliable. The learning curve and soot are worth it. If you're undecided on technology, start with our canister vs liquid fuel guide.
-
For ski tours, moderate winter climbing (-15°C), and budget-conscious teams: Soto WindMaster or GSI Glacier deliver good performance at low cost and low weight. Pair either with a windscreen and careful fuel planning.
-
For ultralight alpinists: Snow Peak LiteMax sacrifices size for weight savings without abandoning reliability. Best for experienced climbers on well-researched routes.
In all cases, remember that stability is kindness. A stove that lights reliably, simmers smoothly, and tolerates wind keeps your team fed, warm, and together, the real measure of expedition success. Test your chosen stove in controlled conditions before the climb, practice in cold weather if possible, and always carry a backup lighter. Plan fuel conservatively, position your cook site thoughtfully, and build menus that the stove can deliver without fuss. The best extreme cold weather stove is the one you've practiced with, trust, and never have to think about during the expedition itself.
Related Articles